Sunday, May 30, 2010

Adding new villa fretwork

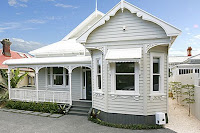
Our villa was built in quite a plain style - it doesn't have the fancy fretwork that many other houses of this era possess.

So while we're sprucing up the front, we're going to add a few bits and pieces to give it a bit more character, and make it look more "villa-ey". It should give our house a bit more street appeal.

Above: The exterior of our villa is quite plain at present.

I did a good amount of research as to what I wanted; a bit of the research was online, but most of it was done by walking round the area with Mr Kiwi (and our dog) to see what we liked and didn't like.

We decided that we wanted to add a little bit of character, but not go overboard: we don't want the house looking too twee and frilly.

As the builders are now hard at work, I made haste to Bungalow and Villa in Morningside.

Even though they sell everything online now, I wanted to see the items for real before purchasing.

I was expecting a small shop, but it turned out to be huge showroom and workshop! They have just about everything you need for renovating a period home.

I bought:
  • Large brackets x 4 (for the bay front)
  • Teardrops x 2 (for the bay front)
  • Small brackets x 2 (to go above the doorway)
  • Finials x 2 (1 for the bay front; 1 for the garage)
These all come in treated paint quality pine, so our next job is to undercoat them and paint them in white enamel.

Above: The fretwork I purchased from Bungalow & Villa now needs to be undercoated and painted.

When I brought these home and showed Mr Kiwi, he exclaimed "wow, our house is actually going to look like a villa!"

Yesss! I can't wait to see what these will look like when installed onto the front of our house!

Project cost: $$ (materials only)

Online inspiration

Finding home renovation ideas in NZ can be frustrating: there are very few good magazines, and while the overseas publications are generally better quality, we can't get hold of the stuff that's featured in them down under!

I've even been surprised at the lack of online resources for people renovating in NZ - which is kinda surprising considering (a) how many kiwis do renovate their homes, and often DIY; and (b) what a powerful - and cost-effective - marketing tool the internet is.

That's one of the reasons I started this blog, to add a bit more variety to the online resources for kiwis renovating their villas.

One website which does seem to have quite a few ideas for kiwis is Homestyle New Zealand magazine... I'll keep an eye out for the magazine itself too :)

Installing Expol underfloor insulation in a villa

While the house is minus front steps, Mr Kiwi took the opportunity to install Expol insulation under the bedroom floor.

Usually this area is difficult to access and only has 2' clearance anyway. Plus it's muddy and full of cobwebs - as well as being criss-crossed with the ducting from our heating system. Not an easy - or a pleasant - job!

Above: The area underneath the bedroom floor doesn't have much clearance, plus there's heating ducting here too. Mr Kiwi has now blocked up the gaps in the weatherboards - there's no more daylight shining through!

The bedroom is south facing and therefore one of the coldest rooms in the house. It also has bare wooden floorboards: they look good, but are pretty darn chilly underfoot in winter! We may Expol more rooms later, but it's not a priority right now.

Expol is made of polystyrene sheets that fit between the floor joists. It comes in 4 different widths and has insulation value of R1.4.

Calculating how much Expol you'll need

The challenge with installing Expol in a villa is that these houses were built in a hurry, generally without plans or building regulations. Consequently, the floor joists were built by eye, rather than with a ruler, and the measurement varies from joist to joist.

In our case, the bedroom joists varied between 300mm and 500mm.

For now, we're just expoling under the bedroom - that's an area of approximately 20 square metres, which requires 4 packs of Expol.

But with the varying joist measurements, we needed to know which size to get.

Mr Kiwi went under the house and measured each joist. From there, he was able to work out how many packs of each size of Expol to get. The 4 packs he purchased were in 3 different widths, so if you're doing this job for a villa it's well worth measuring and calculating before you purchase!

What's more, not all the joists were parallel - many of them tapered. Many of the Expol panels had to be individually trimmed to ensure a snug fit. That's a slow job, and it took Mr Kiwi the whole day to install the insulation under the bedroom.

Home insulation subsidies from the NZ Government

The NZ Government is currently offering householders subsidies for insulating their homes. This is via EECA Energywise.

Alas these subsidies only apply when the insulation is installed professionally: it isn't available for DIY-ers. So no subsidies for us :(


Project cost: $$ (Materials only, for an area of approx. 20 square metres)

PS. I haven't included an "after" photo, as it's now pitch black under the house - it wouldn't be a very exciting photo!!

New wooden steps for our villa

When I first started writing this blog I thought I'd be able to write about each project in a complete article. But I've realised that home renovations don't work in such a neat and orderly manner!

Instead, you start one project which gives you an opportunity to do something else. And in the meantime, quite a few projects are under way till the original project is completed.

Therefore this blog is very much a diary rather than a neat set of articles. If I refer to an ongoing project I'll include links to related posts as much as possible.

So back to the subject of steps.

I've previously mentioned that the wooden steps leading to our front door are rather rotten. Well, they haven't improved over time!

Above: our poor front steps have seen better days! It's not just aesthetic: the wooden boards are actually rotten, and supported underneath by concrete blocks.

Above: Even the strategically placed flower pots struggled to disguise the state of our front steps!

Mr Kiwi has arranged for a builder friend to rebuild the steps. And that work started last week.

The stairs have been removed, and a new set is being manufactured off site.

In the meantime, we have a big gaping hole at the front of our house!

Above: The dog is having a great time watching the builders (she loves power tools etc.)

While the front steps are being replaced, we're also taking the opportunity to re-vamp the front of the house slightly.

Some of the weatherboards need replacing; and the joinery on the bay front tidied up. And as our villa doesn't have much fretwork or other details that villas of this era usually do, we'll be adding some.

Plus, we don't like the current colour scheme, so will be painting the front of the house in different colours. (Painting the rest of the house is a future project - it's a big job, and the front of the house is the priority at this stage!)

More on all of that will be posted here at a later date.

Wednesday, May 26, 2010

Choosing exterior paint colours for our villa

I thought that choosing exterior paint colours for our villa would be fun.

I was wrong.

I've already been to Resene at least 5 times for test points and advice, and we still haven't finalised our choices!

I'm finding that the paler colours look far darker on the villa weatherboards than they do on the paint chart; and the dark colours (for the trim) look paler in reality than on the paint charts. And not all the test pot colours resemble the colour charts. Grrrr!

Which explains why part of our house looks a bit rainbowtastic!

Above: trying paint test pot colours. (The photo shows just how badly our poor house is in need of a lick of paint!)

In fairness, Resene do have great resources available.

For starters, they've got a guide to Heritage paint colours, for people wanting to use authentic paint colours that were in use in the era when their house was built. The eras are:
  • 1840 to 1870: Early Colonial
  • 1870s to 1890s: Mid Victorian
  • 1890 to 1914: Late Victorian and Edwardian
  • 1914 to 1945: Dominion
More information on heritage colour schemes is on the Resene website.

A surveyor reckoned our house was built in 1916, making it "Dominion" era, but according to the Resene information it's more likely that our house is Late Victorian/Edwardian in style... maybe our surveyor was a couple of years out.

These heritage paint colours are, um, quite strong, and not to my taste.

So for us, that's nice information, but we'll be choosing something a little more contemporary!

Above: Resene's Heritage Colour Palette.

In one Resene store I also found this A4 sheet where you can colour in a villa piccie. (I've only seen this at one Resene shop - I've never spied it at any others, so if you're wanting one it might be worth your while phoning around.)

Resene have a similar tool on their website too, where you can use your computer to "paint" a picture of your house, but personally I find that one a bit too fiddly!

Above: "Create Your Own Colour Scheme" sheet from Resene.

Notes on NZ Paint for UK Expats
  • Resene is arguably the most popular paint brand in New Zealand (not Dulux).
  • Paint here seems VERY pricey compared to the UK: both exterior and interior paint.
  • Paint in NZ has to be super durable to cope with the hard UV light conditions in this part of the world. Which probably explains why it's more expensive.
  • Kiwis don't understand the British terminology of "emulsion" and "gloss". Instead of "emulsion" (water-based paint) they say "acrylic". And instead of "gloss" (oil-based paint) they call it "enamel" - which is available in a variety of finishes: gloss, semi-gloss, matte, etc.
I hope I've got that right... I'm still learning!

Oh, the number of times I've gotten strange looks by asking for "emulsion" paint etc... and the people employed in NZ DIY stores aren't that helpful to chicks who don't use the proper (NZ) terms for things! I hope to spare you that embarrassment and belittlement!

Villa renovations re-commence!

The villa renovations got credit crunched for a while, but are now resuming, yeahhh!

More on that later. First of all a quick update on what has been done since my last post.
As it hasn't been possible to do much work on the house itself, I shifted my focus to the garden. It's something I can tackle sporadically in nice weather, between work commitments, etc.

The Landscape Plan

I'd like the garden to look nice, but don't have the know-how or skills to figure out a "look". I don't know which plans like sun/shade/etc. and guessing at it means a lot of dead plants!!

So I got Ace Landscapes to draw up a landscape plan for me:

Above: The Landscape Plan.

It's about 95% perfect, and I now have a plan to work to. The intention is to work on it, one small area at a time.

Preparing The Canvas...

But first of all, it's been a matter of preparing the canvas, so to speak. i.e. clearing out all the stuff we don't like, to make way for the stuff we do want.

Above: the garden before the big tidy up: note the big pile of old branches etc. at the back.

Above: branches etc. have all gone! We filled up a massive skip (or "jumbo bins" as the kiwis call them).

And now, to keep the garden neat and avoid the build-up of more branches, palm leaves, etc. I've got a Sunshine Garden Bin.

It's a big wheelie bin that gets collected every 4 weeks, and it's less than $10 a month. They take away the garden waste and then recycle/mulch it, so it doesn't go to landfill. They don't take bamboo or flax, but we don't have any of that, so it's not an issue.

The challenge will be to keep the garden neat and weed-free over winter!

There's still more clearance work to be done before I can do much planting. Specifically, there are old tree stumps that need to be ground out. But that's a job for another day!

A gallery of villas

Choosing a look for your villa

Someone suggested that before committing to any exterior work that we should have a look around suburbs where there are lots of villas to get some ideas and inspiration.

So off we went, with camera in hand to record the ideas for a "look book".

The first thing we noticed was how many different styles of villa there are! Just finding single bay fronted villas which resemble ours was trickier than we first thought.

To supplement this legwork, looking through online real estate listings or magazines (especially the Property Press) can help too.

It's certainly helped to identify some definite likes and dislikes, though I suspect there's a lot more research ahead while we renovate!

Here are some pics I found online: