Wednesday, June 18, 2008

Ms Mosty-Toasty

... and goodbye to the ugly gas heaters

The new heating system has been installed for a few days now and it's just wonderful.

The whole house heats up within ten minutes of the system being switched on. Lovely!

Very impressed with Climate Control, they popped round yesterday to double check the installation and make sure that we were happy and answer any questions. Now that's good customer service!


The next tasks...
  • The old, ugly gas heaters have been removed and Mr Kiwi is fixing up where they were, which means adding skirting board, door frame, plasterboard, painting, etc. It's not particularly straightforward as there are so many different designs of skirting board and door frame throughout the house: matching them up will be a mission.

  • I'm trying to track down more attractive floor registers.

  • Insulation: there's some insulation in the ceiling already, but it could do with a top-up. And putting insulation underneath the floor boards will prevent a lot of drafts and heat loss too.

Sunday, June 15, 2008

The heat is on!

Heating system installation - the verdict

Just 10 minutes after it was switched on, the house was noticeably warmer and your author is now deliciously warm and toasty. What bliss!

... And that's with the thermostat set on 22 degrees C and the fan on "low". The outdoor unit is quieter than expected, and I can't hear the vents... I suspect they may make a small amount of sound, but it's not audible over the sound of the rain outside.

The time spent researching the right system seems like time very well spent: ending up with exactly what you wanted is a very good feeling!

The installation isn't quite complete: there are a few things that need to be finished off tomorrow, and I'm very surprised at how much work the guys from Climate Control got done in just one day.

Climate Control come very highly recommended. Nice work guys! They left the house in a reasonably tidy condition too.

We will do a few extras for those finishing touches so it's all perfect:
  • I'd like to replace the seven plastic air ducts (also known as floor registers) with more stylish metal ones which would look more stylish and in-keeping with our villa. No NZ suppliers have been found online so far, though there are some in Australia, so I'm hoping to find a supplier who have the right size (350 x 150mm) and is willing to ship them to New Zealand.
  • Mr Kiwi is keen to anodise the metal air return grilles, of which there are three (450 x 350mm). We'll wait to see what colour floor registers we end up with before we send these to be anodised.
The ducting underneath the house takes up quite a lot of space, just as well that there was room for this without it getting in the way. The ducting used is insulated, which will help prevent heat loss from the ducts. It measures approx. 200mm in diameter.

The photo to the right is of the "indoor" unit, which is under the floor of the house. I'll photograph the outdoor unit once it stops raining!


Shopping: trendy mug at a bargain price

I just picked up this mug from The Warehouse.

The graphic black and white floral print is bang on trend, and at just $2.99 it's a bargain!
(I only bought one... I figured it's not quite Mr Kiwi's cup of tea... literally.)

Warming up

Heating system installation

Today is a long-awaited day: heating is being installed in my chilly villa. Hurrah!

Lots of research has gone into choosing the right system, and for anyone contemplating heating their home I'd strongly recommend that you join the Consumer Society to access their online reports on different heating systems. It could save you from making a very costly mistake.

A number of friends have had HRV or DVS systems put in: these raise the temperature by about two degrees, but their primary purpose is to remove the moisture. Humidity is a real problem in the damp Auckland climate, and it's not unusual for clothes, bags and even shoes to turn mouldy. My friends are really pleased with the system, but personally I wanted something with greater heating ability... hey, I'm from Europe, where we heat our houses, and I've found it quite miserable living in a cold house. It's quite common in winter to step outside and for it to be warmer outside than inside!

Our choice was a ducted heat pump system: this is where a heat pump is hidden out of sight and the heat delivered through air ducts in the rooms. In total there are seven such air ducts throughout the house (with two in the larger rooms) and also three air return grilles, as the air circulates. So as well as heating the house, it'll also get rid of the moisture. And dust too, apparently.

Why did we choose a ducted heat pump system?

  • Our villa has very high ceilings, and has heat rises, so it made sense for the hot air to enter through the floor, rather than at a higher level.
  • The ducted system is visually less intrusive: we didn't want ugly units on our walls.
  • Less of a sensation of "being blown at".
  • Ability to heat the entire house rather than just a room or two.
  • Heat pumps are very cost-efficient to run compared to other heating systems.
What's important is that you end up with the system that's right for you and right for your home.

Choosing a supplier

In total four suppliers came to quote, and the quality of their knowledge and experience varied greatly. I'd strongly recommend that you get a number of people in to quote and you'll soon spot who knows their stuff and who's bluffing. Heat pumps are still relatively new in New Zealand, but really growing in popularity, so there are plenty of companies out there installing them to cash in but without the experience or knowledge. So it's quite likely that they'll recommend an installation that suits them, rather than you.

In the end we chose Climate Control, who've been in the industry for a long time and really knew their stuff. They supply Daikin heat pumps, who are the industry leaders. Plus the sales consultant from Climate Control was the only one who didn't patronise me with "ohhhh, a ducted system is soooo expensive..."!

Project cost: $$$$$$

The installers are here right now, I'll keep you updated with how it all goes...

Friday, June 13, 2008

The great fireplace transformation


Cast iron fireplace renovation - AFTER

The verdict

Wow, what a transformation! Even Mr Kiwi was impressed. This has to be one of the cheapest and quickest renovation projects to do.

However, despite my careful masking of the tiles, I did somehow manage to spray them. But this cleaned off easily with "Tub & Tile" cleaner by EcoSense/Melaleuca.

Finishing touches

These cast iron fireplaces can look a bit stark and bare if there's nothing in them, so some pinecones were placed on the grate.

If you don't have any pine trees handy, you can sometimes buy big bags of pine cones on Trade Me - they're sold as fuel for open fires.

The other option is to use rattan balls, like the one pictured. I'm not quite sure where you can buy these: florists may be worth a try.

Giving a cast iron fireplace a new lease of life

Cast iron fireplace renovation - BEFORE

There's an original cast iron fireplace in the bedroom. It doesn't get used and so far Mr Kiwi has used it as shoe storage. So now it's time for a spruce up!

Project cost: $

What you'll need:

  • Masking tape.

  • Newspapers.

  • Dust sheet(s).

  • Vacuum cleaner.

  • Stiff brush/steel brush/steel wool.

  • Stove black paint... all I could find was Plasti-Kote Projekt Paint "Woodstove", which comes in a spray can. Bought from Mitre 10 for $15.96. Otherwise my next stop would have been Dr Flue in Glenfield.
  • Surgical gloves or rubber gloves: the spray can leaked through the nozzle as I was spraying and ended up with a very black index finger.

Clean the fireplace well with the brush and/or steel wool, and then vacuum up the debris. Then mask the surrounding areas well.

Before you start using the spray can, here's what it doesn't tell you...
  • The spray paint STINKS. It's really bad, and harmful to fish etc. so remove any pets from the room and make sure they stay out.
  • The paint also kinda lingers in the air and gets onto the surrounding area, so put down newspapers and dust sheets 2 to 3 metres surrounding the area.

  • If the fireplace you're renovating is in your bedroom, make sure you have a spare room or somewhere to stay for the night. The paint is so stinky you won't want to sleep in that room that first night.

  • Spray any removable parts (e.g. the grille and ash tray thingy) outside of possible.

  • Ventilate the room well: open all the windows and doors to get a draft blowing through.

  • To help get rid of the fumes, a fan heater can help.

I needed to spray at least 2 or 3 coats in total: as it dried, the corroded areas really seemed to suck up the paint, so these parts may need even more paint.

Links

Here are some websites which had useful hints and tips on renovating antique cast iron fireplaces:

The Victorian Society (UK): http://www.victoriansociety.org.uk/Homeowner/3996/fireplaces.html

The Antique Fireplace Company (UK): http://www.antiquefireplacecompany.co.uk/

Dr Flue (NZ) would have been my next stop for information and products: http://www.drflue.co.nz/

During my internet research I found that it was customary for all the cast iron to be black - as well as the flue/chimney bit on the inside. Mr Kiwi thought it was strange at first that I was even spraying the inside black... it might look like a lot of black right now, but I'm sure the final result will be fine!

New hot water system

Bye bye hot water cylinder, hello continuous hot water!

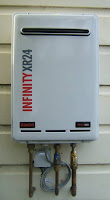
Last week we waved goodbye to our Parker gas hot water cylinder and had a Rinnai Infinity XR24 installed... for various reasons, it was time to upgrade.

We now have a biiiiig huge empty space in the airing cupboard where the cylinder used to be: hmmmm I can feel a towel and sheet reorganisation coming on!

Mr Kiwi took the cylinder apart: it's lined with a huge amount of copper, so that got sold to the scrap metal merchants and he's going to take me out for dinner with the proceeds. The outer part went into the skip with the other rubbish we cleared out last week.

Project cost: TBC

The verdict

So what's the new hot water system like? Bliss!!! The water pressure in the shower is so strong that it almost blasts you back out through the door! And we now have enough hot water to actually fill up our bath tub. Lovely!

Contractors
  • The plumbing and gas fitting was done by Plumbing Magic.

  • The electrical work was done by Jon King Electrical.
They all did a great job and come highly recommended.